
The Nightmare is a group boss located in the Sisterhood Sanctuary, a dungeon beneath Slepe in Morytania.
Requirements
- Completion of
 Priest in Peril to access Morytania.
Recommendations
- High combat stats. Although not required, see the skill levels below for an indication of the advised stats:
- Level 85 or higher
- Level 85 or higher
- Level 85 or higher
- Level 85 or higher
- Level 85 or higher
- Level 70 or higher
- Level
- Completion of A Taste of Hope for the Drakan’s Medallion, which is the quickest teleportation method
- Alternatively, completion of Ghost Ahoy for the ectophial, which is the second quickest teleportation method.
- Alternatively, completion of
Getting there
The four quickest methods of reaching Slepe, where Phosani’s Nightmare resides, are (from fastest to slowest):
- Teleporting directly to Slepe via Drakan’s medallion after unlocking this teleport via Slepey tablet, which is a drop from Phosani’s Nightmare.
- Teleporting to Hallowed Sepulchre using a Hallowed crystal shard, then running east to Slepe via an agility shortcut that requires 63 Agility and installing 2 Long ropes
- Teleporting to Ver Sinhaza via Drakan’s medallion, then running north. Once players pass the small dock, run east to arrive at Slepe.
- Using the Ectophial to teleport to the Ectofuntus, then heading north to the small dock and paying Andras 10,000 coins to row to Slepe. The player will arrive at a dock just south-west of Slepe.
Starting the fight
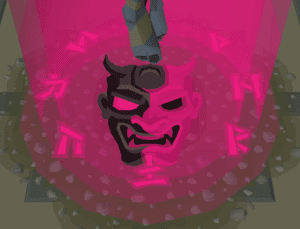
Players can initiate the fight by disturbing The Nightmare while she is in her sleeping state.
If there is already a fight in progress, The Nightmare will be seen in a floating state with a glowing symbol on the ground beneath her. During this state, the symbol will indicate which of the 3 phases the current fight is in:
-
This symbol indicates the fight is in the first phase.
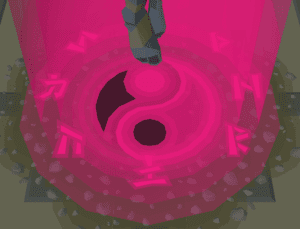
-
This symbol indicates the fight is in the second phase.
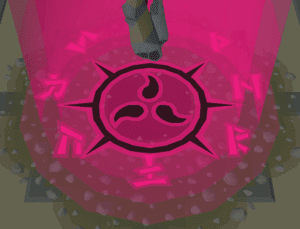
-
This symbol indicates the fight is in the third and final phase.
If The Nightmare is already in her floating state, players will need to wait for the current fight to finish as her instance is not joinable mid-fight. Alternatively, players can hop to look for potentially available worlds.
Mechanics
The Nightmare’s mechanics scale accordingly to the amount of players present when the fight starts. By default, she automatically scales her shield and totem charge to that of a 5-man encounter, and thus team sizes below that will use this value.
Shields and Totems
Players do not damage the Nightmare’s physical health directly – instead, they must break her shield during each of her three phases, after which players can attack four totems in each corner of the boss room.
- The Nightmare has a minimum shield durability of 2,000 per phase, capping at 19,600. This value increases by 200 from the base amount for every player in a six man or greater encounter.
- The totems have a minimum charge requirement of 300, capping at 2,640. This value increases by 30 from the base amount for every player in a six man or greater encounter.
- The amount of sleepwalkers present during phase transitions will gradually increase with more players present in the arena.
Once the shield is shattered, players must stop attacking the Nightmare (as their attacks will have no effect on her) and must instead charge the totems around the corners of the arena. When all four totems are fully charged, they will unleash a magical blast of energy onto the Nightmare, dealing 800 damage to her. The Nightmare has 2,400 physical health, and does not regenerate it, so three blasts will end the encounter. After the first 800 damage, the Nightmare will be in phase 2, and after the second blast of 800 damage, the Nightmare will be in phase 3, also known as the final phase.
The totems cannot be leeched off of with blood spells. However, the Sanguinesti Staff’s and amulet of blood fury effects do work. Players do not receive any experience for dealing damage to the totems, and they will take two times as much damage if struck with magic.
Standard attacks
Players can use protection prayers to mitigate damage from some of The Nightmare’s attacks, in a manner similar to the Great Olm – attacks that are successfully prayed against will deal less damage, while an attack that is incorrectly prayed against will result in more damage; 120% of her maximum hit for her melee attack.[1] This may also be the case with her Magic and Ranged attacks but has yet to be confirmed.
The Nightmare has a unique aggression mechanic in which she determines the highest Defence roll out of all five types for each player in her dream world, and will immediately focus on the player with the highest overall value.[2] This in turn makes her melee attack only hit in the direction she is facing.
- Ranged attack: The Nightmare will contort herself and shoot out projectiles toward players; having game sounds enabled will help as this attack performs a loud clicking sound per contortion. Players have 3 ticks (1.8s) to react with Protect from Missiles.
- Magic attack: The Nightmare will flail to the side surrounding herself with pink flower petals, then spin back shooting the petals toward players. Players have 3 ticks (1.8s) to react with Protect from Magic.
- Melee attack: The Nightmare will charge her claws and quickly slashes forward. Players have 2 ticks (1.2s) to react with Protect from Melee.
- Melee damage is dealt to everyone in front (including diagonally across) as well as under her. This attack will always hit regardless of the player’s defensive bonuses, but it can be avoided by simply being in a direction the Nightmare is not facing or walking one tile away if facing her.
Special attacks
- Grasping Claws: The Nightmare will spawn a black portal underneath her, and numerous smaller “end” portals before sticking her claws inside. If the player stands on any portal, they will take up to 50 damage. Simply move into a tile free of a black portal to avoid damage. The Nightmare uses this attack during all three phases.
- Sleepwalkers: At the start of the second and final phases, the Nightmare will summon sleepwalkers that walk toward her, the number of which is dependent upon the number of players in the instance, ranging from 1-24. They possess 10 health, but instantly die upon taking any damage. At the end of this attack, she will charge up a power blast that hits all players in the room for a minimum of 5 damage. The more sleepwalkers she absorbs, the more damaging the power blast becomes, capable of dealing over 70 damage to each player in masses. This damage is unavoidable, so kill as many sleepwalkers as possible before they reach the Nightmare. In a solo encounter, if the player doesn’t kill the sleepwalker, the power blast will always result in death.
- Husks: The Nightmare spawns two husks around random players in her arena. The targeted players will be frozen in place until the husks are killed. The blue, skinny husk uses magic attacks, while the green, bulky husk uses ranged attacks. The Nightmare will not spawn Grasping Claws portals under players that are frozen by the husks, however if the player is under the Nightmare while frozen by husks they will still take damage. The Nightmare only uses this attack during phase 1.
- Corpse Flowers: The Nightmare will divide the room into four equal quadrants with lines of flowers. One quadrant will be safe as indicated with white nightmare flowers, while the remaining quadrants are unsafe as indicated with red nightmare berries. The safe quadrant is the one with both sides having nightmare flowers. If the player is standing on a quadrant with nightmare berries, they will rapidly attack the player for up to 20 damage every tick. The Nightmare will heal for double the amount they deal, and any attacks made from an incorrect quadrant will also heal her. This attack is only used during phase 1.
- Standing on a quadrant with only nightmare berries will cause players to take twice as much damage as the berries on both sides will attack them.
- Curse: A pink glow fills the player’s screen and protection prayers are shuffled. Clicking on Protect from Magic activates Protect from Missiles, Protect from Missiles activates Protect from Melee and Protect from Melee activates Protect from Magic. After 5 attacks, the curse is lifted. The Nightmare only uses this attack during phase 2.
- Parasites: The Nightmare throws a parasite onto random players. After ~18 ticks (10.8s), it will grow and burst out of the player, dealing massive damage, and will then begin healing the Nightmare until killed. Drinking a dose of Sanfew serum or Relicym’s balm before it emerges will weaken the parasite and greatly reduce the damage taken when the parasite bursts out. The Nightmare only uses this attack during phase 2. Players may click the Hitpoints Orb to weaken the Parasite instead of clicking the potion within their inventory as well.
- Surge: The Nightmare will teleport to one of the four edges of the room, then immediately surge across to the opposite side dealing up to 60 damage to anyone caught in her path. Move out of the way to avoid taking damage. The Nightmare only uses this attack during phase 3.
- Spores: Puffshroom like objects spawn around the arena. Standing within 1 tile of one will cause it to explode, causing the player to become weary; their run is disabled and their attack speed is increased by 1 tick for a short duration. The Nightmare only uses this attack during phase 3.
The Nightmare summons a pair of husks.
-
The Nightmare’s Corpse Flower attack, followed by her Grasping Claws attack.
Fight overview
Players should pre-pot with an Anglerfish and a sip of a stamina potion before running over to the Nightmare from a bank. Players should also be familiar with the Nightmare’s mechanics, especially which special attacks are used during each phase, and how to take down all of the Sleepwalkers that spawn between phases. When bringing a team, it’s not uncommon to designate players to specific sections of the arena, to more consistently deal with all of the Sleepwalkers. In larger teams, consider bringing Blood Barrage on one or more players, to dispatch multiple Sleepwalkers at once. If in a smaller team, such as a duo, if one player dies, the remaining player must deal sufficient damage, or they will be automatically teleported out of the instance, with a message saying, “The nightmare grows tired of your poor efforts.”
The Nightmare is susceptible to defence-reducing special attacks, such as dragon warhammer’s, but she will restore her defence stat back at the rate of 20 defence per minute.
As the Nightmare has extremely high shield charges, players soloing the boss generally do so for the sake of Combat Achievements or practicing for Phosani’s Nightmare, as each solo kill generally takes well over 16 minutes. If the boss is being fought solo, an amulet of blood fury and/or Sanguinesti staff is absolutely required to counter all chip damage incurred during the fight.
Phase 1
The Nightmare will choose her target based on their defence bonus and their Defence level. If your team has a designated tank, they should pray melee, switching to ranged or mage prayer when appropriate. The rest of the team should stand on different sides than the tank, so that the Nightmare is not facing them, meaning that they can ignore her melee attacks entirely.
During this phase, the Nightmare will use the special attacks Grasping Claws, Husks, and Corpse Flowers. Deal with these special attacks while continuing to have the correct prayer active.
Players immobilized by Husks will usually not have a portal spawn under them during the Grasping Claws attack, and the Nightmare does not seem to use the Corpse Flowers attack while players are immobilized. During the Corpse Flowers attack, be aware of where your tank is – players who end up on the same side of the Nightmare as the tank will need to be aware that they can be hit by the Nightmare’s melee attack afterward, and should move or pray accordingly.
After depleting the Nightmare’s shield, the totems will become vulnerable. The Nightmare will continue using its phase 1 attacks while you attack the totems. Fully charge all four and they will damage the Nightmare for 1/3rd of its health, and begin phase 2.
In this phase, be cautious of fully charging all of the totems if the Nightmare has not recently used her Husks attack. If she spawns Husks as the Totems fully charge, it can result in one or more players being immobilized while the Sleepwalkers spawn at the start of the next phase, possibly leading to the party taking massive damage from her power blast. It is recommended for immobilized players to use their magic weapon to kill the Sleepwalkers to prevent the party from taking massive damage.
If players bring a Saradomin godsword they can use a special attack on the Sleepwalkers to restore health and prayer.
Phase 2
The Nightmare will use her Sleepwalker attack at the start of this phase, and will deal considerable damage to your party if not all of the Sleepwalkers she spawns are killed. This is a good time to restore some HP and Prayer with a saradomin godsword special attack, if you brought one.
During this phase, the Nightmare will use the special attacks Grasping Claws, Curse, and Parasites.
The Nightmare will spit out parasites from her mouth, which will then fly towards random player(s) in the arena based on the group size. When this occurs, the player’s Hitpoints icon will turn pink. If the player does not drink a dose of Relicym’s balm or sanfew serum before the parasite bursts from the player, they will take massive damage, and the parasite will be stronger, spawning with 80 hitpoints and slightly more defensive values compared to a weakened parasite. If the player does drink one of these two in time, the damage dealt is much less, and the parasite will have 40 hitpoints instead.
Parasites will immediately prioritise the Nightmare if her shield is depleted, launching a projectile at her that restores 31-50 of her shield charge for every attack they make. During the totems part of the fight, parasites will not focus on the Nightmare, but instead attempt to reverse the charges on the totem for the same amount. Therefore, it is highly vital to kill them as soon as they appear to prevent them from unnecessarily prolonging the fight. Try to maximise attack bonus and strength to kill the parasites as quick as possible. If there are no suitable targets, the parasite will attack player(s) instead, alternating between Ranged and Magic, with the former being used as the first attack.
Parasites are extremely annoying in this phase, especially in solo encounters since the player will likely have to deal with multiple parasite specials in a row.
Phase 3
This phase begins with a Sleepwalker attack, just like the last one. Deal with it normally, optionally healing on the Sleepwalkers using your SGS or Blood Barrage.
During this phase, the Nightmare will use the special attacks Grasping Claws, Spores, and Surge. Spores will be scattered in set patterns around the arena, and while they have a 1×1 appearance, they actually have a 3×3 AoE. Getting in a spore’s AoE will cause it to burst, making whoever triggered it lethargic, disabling their run and decreasing their attack speed by 1 tick for a short duration. This can spread to other players, so avoid infecting them with spores.
It’s common that the Nightmare will use her Grasping Claws attack while some spores are still active. Whenever spores are active, figure out beforehand which square(s) you can walk to so that you’ll dodge a Grasping Claws portal without triggering any spores.
After the Nightmare’s shields are depleted, simply charge all four totems for one final time while continuing to avoid her phase 3 special attacks, and the Nightmare will be defeated.
Equipment
Note that The Nightmare is not undead, therefore items such as Salve amulet will have no effect on her.
| Slot | Recommended equipment for Melee – Item (most effective → least effective) | ||||
|---|---|---|---|---|---|
| N/A | |||||
| N/A | N/A | ||||
| N/A | |||||
| N/A | |||||
Equipment
- Upgrades to melee gear should be prioritised over magic gear upgrades.
- Using an alt account will allow for higher kill trips, as you can trade supplies or cast Energy Transfer between kills.
- If you are tanking, ensure that you have the highest defence bonus of all players in the group. Easy ways to ensure this are to wear Guardian boots over Primordial boots, wear Torva armour over Inquisitor’s armour, wear Barrows gloves over Ferocious gloves, or wear a Ring of suffering. Keep in mind to keep Piety activated at all times and only bring a magic armour switch if everyone else in the group is also doing so.
- All players not using a Dragon warhammer should use their Saradomin godsword special on the sleepwalkers that spawn between phases.
- In smaller group sizes, substitute some Anglerfish and Divine super combat potions for regular Super combat potions and Saradomin brews.
- Consider bringing an Amulet of blood fury when learning the boss for the passive healing effect, however this will increase supply costs per kill and slightly lower your DPS.
- If flicking Piety during kills, fewer Super restores will be required. This is not recommended for the tank as if piety is accidentally deactivated, The Nightmare may target another player as the defence bonus from the prayer is removed.
- If using thralls, the ghost (Magic) thrall is the best to use because it benefits from the double damage on totems.
As the Totems possess no stats, magic accuracy is not beneficial. Add magic damage switches when possible as all magic damage is increased significantly.
|
|
| Slot | Recommended equipment for Mage – Item (most effective → least effective) | ||||
|---|---|---|---|---|---|
| N/A | N/A | N/A | |||
| N/A | N/A | N/A | N/A | ||
| N/A | N/A | N/A | N/A | ||
| N/A | N/A | N/A | |||
| N/A | N/A | N/A | |||
| N/A | |||||
| N/A | N/A | N/A | N/A | ||
| N/A | N/A | N/A | N/A | ||
| N/A | N/A | N/A | N/A | ||
| N/A | N/A | N/A | |||
- As the pillars have no defence, only armour with magic damage bonus has any effect. The priority for these are: Imbued heart (if using a Powered staff) > Occult necklace / Tormented bracelet / Elidinis’ ward (f) (only if using a 1 handed staff) > Elidinis’ ward / Ancestral robes > Imbued god capes / Virtus robes / Magus ring.
Equipment
|
|
- Gear progression for solos is the same as that for 5 man
- As kills will be long, replacing Ancestral robes with extra Saradomin brews is advised to allow for more mistakes.
- Use a Dragon claws special against the boss whenever your special attack regenerates, except for in Phase 2/the end of Phase 1 where they should be used against the Parasites.
- Switch to the Abyssal bludgeon to kill any Husks that spawn or Parasites that you do not have enough special attack for. Alternatively, use the Inquisitor’s mace or no switch at all, however the scythe has poor DPS against these spawns.
- During Phase 2, walk underneath The Nightmare just before the parasite bursts out. This happens roughly 5 bludgeon/mace attacks or 4 scythe attacks after the parasite attack lands. If the parasite spawns underneath the boss, it will be unable to heal the boss until it moves. Use this to kill any parasites that spawn and reduce their healing.
- Prayer flicking piety during the kill will save a significant number of prayer points, this can allow you to bring more brews.
- Using an Amulet of blood fury is recommended for learning solo kills and will reduce the need for brews substantially, since kills are long and The Nightmare does low overall DPS against you.
- The Sanguinesti staff is especially useful for healing the player since magic damage against the totems is doubled. As a result, it is recommended to use the Sanguinesti staff when learning solo kills.
- If using thralls, the ghost (Magic) thrall is the best to use because it benefits from the double damage on totems.