
The Kalphite Queen is a boss located in the Kharidian Desert. She is stronger than her combat level suggests due to her damage output ability.
If using the non-instanced version of the Kalphite Lair, players may fill a Looting Bag and their inventory with supplies and die within the lair, leaving a pile of supplies on the ground for 60 minutes which allows much longer trips.
Suggested stats
 80+
80+- 75+
- 75+
- 70+
- 75+
- 70+ for Piety (74+ for Rigour)
- 86 for the shortcut after the Elite Desert diary
Getting there
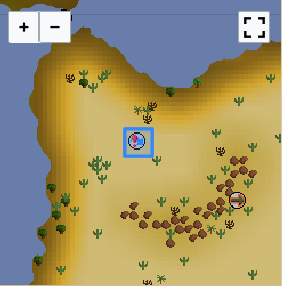
The Kalphite Queen is located at the end of the Kalphite Lair. It is highly advised to complete both the Elite Lumbridge & Draynor Diary and at minimum, the Hard Desert Diary. The former avoids the need to bring a dramen or lunar staff, as the lair is very close to the BIQ ring. The latter avoids the need to continually bring ropes (though two will be needed to set the ropes in place). While the Elite Desert Diary unlocks a shortcut that is usable at 86 Agility, one of the tasks needed requires the player to speak to a mounted head inside their player-owned house, which essentially locks the shortcut until the kq head is obtained. Once the Elite Desert Diary is completed however, the shortcut becomes usable with the appropriate Agility level, which is essentially required for long-term farming, especially for those seeking the kalphite princess.
From the surface area, players go west of the Shantay Pass until they find a bulging tunnel; this is where a rope is needed for players. From the dungeon area, walk south through the tunnel to reach the lair; another rope is needed here.
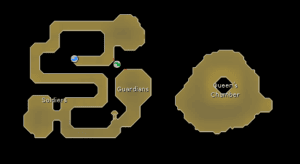
Once in the lair, players will go around a fairly large tunnel section with hostile soldiers, which can poison if they damage you. At the end is a chamber with two Kalphite guardians and another bulging tunnel; this is where the other rope is used. Like the soldiers, the guardians can poison, so being under the effects of an anti-poison potion is recommended so the player does not get hit with poison while fighting the Queen.
After going down, there is another set of guardians. On the other side is the Queen; drink potions and put on protection prayers before charging in.
The fight
Tip: Unless wearing a serpentine helm for the duration of the fight, either sip an antidote++ before going to the lair to save an inventory slot, or bring the potion in with you during the fight.
The Kalphite Queen has 510 Hitpoints, split across two phases. Her Magic and Ranged attacks will always land as successful hits. While unlikely, it is possible for them to land but deal no damage. Her Ranged attack will drain 1 prayer point if it deals more than 0 damage. Her Melee attack does not share the unique accuracy mechanic, and is treated as a standard attack meaning that standing next to her will decrease her DPS. Unlike the soldiers and guardians, this melee attack does not poison. When standing in melee range of the Kalphite Queen, she has a 1/2 chance of doing a melee attack, while her Magic and Ranged attacks each have a 1/4 chance of triggering.[1]
There are two phases of the fight, similar to Vet’ion. While in her grounded form, the Kalphite Queen has Protect from Magic and Protect from Missiles active; however, they only add increased Defence to those styles rather than full immunity like the player versions of them.
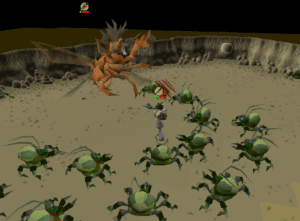
When her first form falls at zero health, her chitin will crack open to reveal her second form, a wasp-like creature. This airborne form has Protect from Melee active; however, like the first form, this only provides increased Defence.
Note: Upon triggering the second form, there is a time limit of 20 minutes for defeating it. If not defeated within this time frame, the Kalphite Queen returns to the first form, though she carries the health she had left on her second form when she reverted back.
Her ranged attack will hit players close to the main target. To avoid this, players in a group can stand on opposite sides of her. This positioning (combined with Protect from Magic) will greatly reduce the amount of damage taken over the course of the fight.
Throughout the fight, if the Kalphite Queen is near any of the bulging cocoons, there is a 1/20 chance it will hatch an aggressive Kalphite Worker each time the Queen is hit (including on unsuccessful hits).[2][3] These only stay for a while before despawning. It is advised to get the Queen near them so the workers will spawn. This is because if there are plenty of workers around her, she will be unable to move at all while they are present, and allow the player to easily flinch her for longer trips. This is only viable with melee, as there is not enough time to dodge her attack if flinching her with Ranged or Magic. An exception to this are salamanders, which work like a melee weapon and can deal magic damage.
Her attacks can be tick-eaten, however her ranged and magic attacks do have different projectile speeds and as such, it is advised to always make sure to heal up when below 31 Hitpoints to prevent the risk of dying. It is recommended to step under her during this to not take more damage.
Equipment
This method is mainly for ironman players and others using inexpensive gear (less than 1 million gp) or gear that mid-game players are likely to have or be working toward anyway. It involves flinching the queen in the melee phase and hoping that no one crashes you. As with the other methods, it is recommended to use this method on a Slayer task, as the Slayer helmet can give very large bonuses. This setup also assumes you have already completed the hard Desert Diary and no longer need to bring rope. If you have the ornate rejuvenation pool and fairy ring in your player-owned house, teleport there after finishing each kill to use the pool and teleport back (BIQ). Notes about specific gear:
- You can use whatever weapon you’d like for the melee phase, but opt for harder-hitting weapons over faster ones because you’ll be flinching anyway.
- For your special attack weapon, chose whichever best suits your stats. The main goal is to speed up the second half of the fight by reducing her defence. If you find that you’re hitting her pretty consistently in the second half, then you might not need to worry about this.
- If you have a high attack and slash attack bonuses, Arclight/Darklight lops off up to 15 attack, strength, and defence per successful hit. Bring a Fire cape and maybe a defender instead of a shield to help with accuracy.
- If you have a high max hit, the bone dagger can slice off quite some defence, but only your first hit is guaranteed to hit, so plan on only using the special once per kill.
- If the barrelchest anchor is your main melee phase weapon, you can consider using it also for its special attack, saving you an inventory slot. While the stat drain is negligible, the anchor’s special attack gives a 100% accuracy and 10% strength boost, meaning you can hit in the high 20s/low 30s fairly accurately with the special attack, even with base 70 combat stats (with boosts and Piety).
- Bringing ancients is optional, but it can help with surviving under bad luck conditions. If you have a rune pouch, this makes it even more worthwhile. It also helps add a few (potential) hits to the queen during her second phase.
- Any antipoison potion works, as long as it gives you a small amount of immunity. Iron players may find regular antipoison to work best here, as it’s cheap and easy to get (from Jiminua’s Jungle Store).
- If you have access to a quest point cape and have built a fairy ring in your house, you can replace the house teleport tab with the Quest point cape, so that you can also bank and return to a fairy ring more easily.
- If you have completed the elite Lumbridge & Draynor Diary, then you can replace the dramen staff with another piece of food or equipment.
- You can use guthix rests in place of antipoisons/antidotes and some food, but keep in mind that this doesn’t provide immunity, only a reduction of poison severity.
- Protect from Melee will not prevent you from getting poisoned, but higher defence bonuses will reduce your chance of being poisoned.
| Slot | Recommended equipment for Mid-game Players (Phase One) – Item (most effective → least effective) | ||||
|---|---|---|---|---|---|
| N/A | |||||
| N/A | N/A | ||||
| N/A | N/A | ||||
| N/A | |||||
| N/A | N/A | N/A | |||
| N/A | N/A | N/A | N/A | ||
| N/A | N/A | N/A | |||
| N/A | N/A | N/A | |||
| N/A | N/A | ||||
| N/A | N/A | ||||
| N/A | |||||
| Slot | Recommended equipment for Mid-game Players (Phase Two) – Item (most effective → least effective) | ||||
|---|---|---|---|---|---|
| N/A | N/A | ||||
| N/A | N/A | ||||
| N/A | |||||
| N/A | N/A | ||||
| N/A | N/A | ||||
| N/A | N/A | ||||
| N/A | N/A | N/A | |||
| N/A | N/A | N/A | |||
| N/A | |||||
| N/A | N/A | ||||
| N/A | |||||
Inventory
- Range switch, e.g. (See Second phase below for alternatives) Rune crossbow, Armadyl d’hide body, Ava’s assembler, Armadyl d’hide boots
- 1 Super restore or Prayer potion in case you run out of prayer
- 1 Super combat potion or Super attack potion (especially if attempting at 70 attack or lower)
- 1 Ranging potion
- 1 Antidote++ or Antidote+ or Super anti-poison or Anti-poison or Guthix rest
- A house tab for restoring health/specs between kills or escaping and a Dramen staff for the fairy ring back
- Rune pouch with runes to cast Blood burst or Blood barrage
- Moderate-healing food like Monkfishs or better to fill the remaining inventory spaces; swap one Monkfish out for an Anglerfish if you’d like, but this is likely a waste.
Setting up
Make sure you have around 70% run energy before you head into the lair. You’ll need to do some running to attract the Kalphite Guardians and the Kalphite Queen, and running out of run energy can force you to tank more hits from the Queen herself. Since you probably don’t have the elite Desert Diary done, you’ll have to take the long way around — walking this part helps conserve run energy.
Turn on Protect from Melee as you go into the KQ lair to attract the two Kalphite Guardians near the second entrance, then find the Kalphite Queen to attract her attention. Switch to Protect from Missiles as soon as you have the KQ’s attention, and run back to the entrance of the lair. The two Guardians should be east of the Queen as she approaches. You can turn off prayer and sip a dose of antipoison as you wait for her to approach.
Once the Queen has reached the Guardians (usually you will tank a hit here, so remember to turn Protect from Missiles back on when you think the Queen is almost in range), run to the north side of the Queen and stand on one of the two western-most columns. You will be hit at least once here by the Queen. This will pull one of the Guardians to the north-east side of the Queen, allowing you to push the Queen south-west to the safespot.
Once the Guardian is able to attack you on the north side of the Queen (should only take a few seconds for it to get there), step onto the south-western-most tile of the Queen. This will pull both Guardians to the best spots for forcing the Queen into a south-western movement pattern. Eat to restore some health, if needed. If both Guardians somehow end up on the eastern side of the Queen (she’s 5×5 tiles, while the Guardians are 4×4 tiles), then you’ll likely have to reset or restart.
Your goal is to force the Queen into the flinching safespot such that her south-westernmost tile is a few tiles west of the southern-most Potato cactus spawn in the lair. This is the best flinching safespot. Another option is for her south-western-most tile to be 1 tile north-west of the optimal spot. Any further west and one of the Guardians may lose interest and walk away, causing you to lose the safespot. (Another safespot option is to lure the Queen into the middle island, but this is generally less favourable.)
First phase
During the first phase, you’ll be flinching her with your melee weapon. You can flick Piety or other melee-boosting prayers, but it’s really not necessary, though it might be helpful if you’re using a Bandos godsword, arclight/darklight, bone dagger, or a barrelchest anchor for your special attacks.
To flinch, first stand on the middle-western tile of the Queen, and turn attack options to right-click only. When you’re ready to attack, right-click the Queen and choose the attack option, then quickly click back under her. This allows you to hit her once without her retaliating (this only works for melee attacks). Wait for her health bar to disappear before stepping out again, and repeat until her beetle phase is dead.
Second phase
During the second phase, set Protect from Missiles and Rigour or Eagle Eye as your quick prayers. You can also pray Protect from Magic instead, but the Queen seems to attack with ranged just a bit more than magic. Stay under the Queen as she transitions into her wasp phase. If you’d like to heal up with blood spells, unequip some of your gear first, and cast the spells on the Kalphite Workers that are nearby.
If you’re using a rune crossbow, it’s recommended to use a 1:1 attacking strategy. For example, attacking the Queen 3 times (and receiving 3 attacks in return), then walking under for a few ticks before stepping out again. This allows you to take about 25% less damage while not reducing your own DPS too much. You can also take the time to heal up on any damage you took. It’s also helpful to have the hard Kandarin Diary completed for more enchanted bolt procs.
If you’re using a magic shortbow, it’s recommended to step under when you’re eating, to avoid letting the Queen get extra hits on you.
As you’re doing this phase, it’s recommended to stay just 1 tile west of the Queen (like when you were attacking during the first phase) if you have 70+ Defence. By staying in melee range, you have a chance of receiving the Queen’s melee attack, which unlike her ranged or magic attacks, is fairly inaccurate. If using a crossbow, it may be beneficial to bring a good stab-resistant shield instead of a Book of law or Unholy book for the extra defence bonus against her stab melee attacks. The ranged attack bonus you lose is negligible, especially if you have a higher ranged level.
For players with lower defence, it’s recommended to stay out of melee range and just tank 50% of her hits. You may end up consuming more food this way, however, so prepare to bring better food if you find that you’re running out of supplies or having to resort to blood spells often.
