
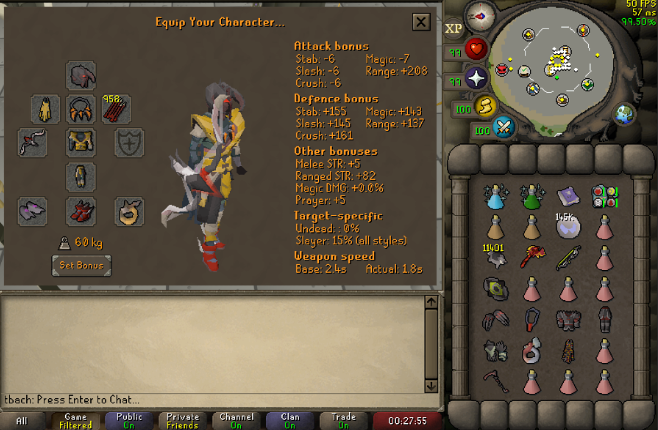
Inventory / Gear
Gear Downgrades
- Webweaver → Craws/bofa
- Masori body/legs → Crystal chest/legs
- Zaryte vambraces → Barrows gloves
- Lightbearer/ring switches depending on time
- Can take less melee switches initially as you learn and get used to it, order of what to bring below
Additional Items as you get Faster
In order of importance… Note: Dragon arrow (p++) can poison magers, small timesave.
- Dragon claws + Divine super combat
- Ferocious gloves + Scythe
- Bloodfury
- Infernal cape
- Torva body + legs
Useful Plugins
- Entity hider
- “Hide Dead NPCs” should be toggled on
- NPC Indicators
- “Ignore dead NPCs” should be toggled off
- FC Spawn predictor
- “Wave Display Mode” set to “Next”. Displaying the current wave looks too crowded and can cause more confusion.
- Enable lobby rotation info
- Ground object hider
- Under “IDs to hide”, add the following
- 11849,11850,11848,11847,11985,
- “Hide All” option should be toggled off
- Makes it easier to see bats and other npcs, by making the ground all black
- Under “IDs to hide”, add the following
- Tzhaar HP tracker
- Make sure to select a highlight style, and turn “Hide Dead NPCs” OFF in order to force overkill with craws bow, using this option in caves hides things too early, but the red box function is very useful
General Tips
- THE BIGGEST TIME SAVE IS LEARNING THE WAVES PROPERLY!
- Thralls, claws, melee swaps, etc… are small in comparison.
- Spawn predictor is in RuneLite. There’s no excuse, watch some vods.
- Generally start waves near highest hp monsters and kite towards/pull other npcs.
- If you nuke something like a melee or mage and lose a tick or two running because of it, this is a good problem to have.
- Thralls function as a DPS source and death animation speed up, constantly re-summon as needed.
- If your thrall isn’t attacking anything or about to be, resummon.
- You shouldnt be ending runs with a lot of prayer left over, if you are, you’re not summoning enough.
- Avoid dragging the last npc on death!
- This loses you 2 ticks every single time.
- There are very few instances where it is worth dragging the last NPC.
- The first blob spawn, for example, is a good instance to drag.
- You should always split the distance between npcs.
- Unless you’re safe spotting something or setting up a chin, you can almost always be prepping the rest of the wave or the next wave by positioning better.
- Pop blobs early-ish into the wave so you can hit something during their death animation.
- Claw spec melees as often as possible until mages come out.
- Specing magers becomes better and more viable as you bring more melee switches and gives you another option to dump a spec on.
- Rangers almost always die fast to BP, only one worth clawing is the very first.
- Use NPCs similarly to a pillar in inferno.
- You can even safe spot melees on the small 1×1’s if setup correctly. This also allows for more flexibility with chins.
- Can have the “Vial Smasher” option turned off to prevent your weapons from moving and staying in line with prayers and closer to spec bar.
General Mistakes
- Losing a tick on target transitions / weapon swapping.
- Always be ready to attack the next npc on an xp drop you think will kill it, can always come back to that npc especially if other npcs left in the wave
- Killing all the small npcs before the big ones.
- Mage, range, melee have 2 tick longer death animation than bats and bloblets
- Try to keep something small alive to end a wave, and if not can scythe finish large npcs
- Unknowingly dragging npcs on deaths.
- Under the NPC Indicators plugin, turn off the “Ignore dead NPCs” option to make it easier to tell when you are dragging an npc at the end of a wave.
Tile Markers – some useful tiles used in runs
[{"regionId":9551,"regionX":20,"regionY":54,"z":0,"label":""},{"regionId":9551,"regionX":10,"regionY":23,"z":0,"label":""},{"regionId":9551,"regionX":44,"regionY":15,"z":0,"label":""},{"regionId":9551,"regionX":50,"regionY":25,"z":0,"label":""},{"regionId":9551,"regionX":17,"regionY":23,"z":0,"label":""},{"regionId":9551,"regionX":40,"regionY":25,"z":0,"color":"#FFA8A8A8"},{"regionId":9551,"regionX":23,"regionY":40,"z":0,"color":"#FFA8A8A8"},{"regionId":9551,"regionX":17,"regionY":46,"z":0,"color":"#FFA8A8A8","label":"BP"},{"regionId":9551,"regionX":47,"regionY":25,"z":0}]