
To do blast mining efficiently, it is important to:
- Minimise the time wasted waiting for dynamite to explode.
- Minimise the time spent running to and from the deposit sack.
- Minimise the amount of damage taken.
These are much easier if a consistent strategy is used, following a chosen pattern repeatedly. There are many patterns that may be used, with some variation keeping the above points in mind.
Requirements
 43 Mining
- Chisel
- Tinderbox
- 1 × dynamite for each blasted ore mined
Recommended
- High Hitpoints to sustain several explosions, in case of mistakes
Setup
| Slot | Item (most effective → least effective) | |||
|---|---|---|---|---|
| N/A | N/A | |||
| N/A | N/A | |||
| N/A | N/A | |||
| N/A | N/A | |||
| N/A | ||||
| N/A | N/A | N/A | ||
| N/A | N/A | N/A | ||
- Improves energy regeneration
- Reduces energy loss
- Increases experience gained
- Boosts Mining level
Inventory
- Chisel
- Tinderbox
- Dynamite – multiples of the amount used in one cycle of your chosen pattern
- Super energy or stamina potions – filling the remaining slots, if losing run energy
It is recommended to equip pieces of the prospector kit when collecting washed ore from the operator, as the outfit will increase the received experience. It has minimal impact on the experience gained when excavating whilst graceful provides weight reduction. With a high agility level, wearing a mix of prospector and weight reducing gear is enough to sustain run energy.
Patterns
The following patterns are offered in order of efficiency, measured by the rate of mining blasted ore.
It is recommended to collect washed ore from the operator only when the sack is full, at the end of your trip, or to improve future ore quality by increasing one’s Mining level.
When following these patterns, note that your character can move before the deposit animation is complete, reducing the time it takes to deposit.
North-west 8-rock
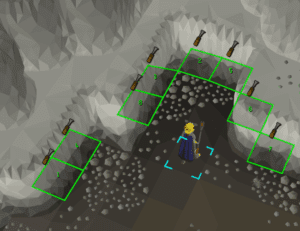
This pattern uses the north-west corner, depositing eight blasted ore with each cycle. This pattern is highly efficient but offers little margin for error. This pattern can yield up to 385 blasted ore mined per hour at maximum efficiency, including banking every 3 cycles.[1]
Using the image as a reference:
- Excavate, place, and light dynamite on rock 1
- (If repeating) Pick up blasted ore from rock 1
- Excavate and place dynamite on rocks 2 and 3
- Light dynamite on rocks 2 and 3
- (If repeating) Pick up blasted ore from rocks 2 and 3
- Excavate, place, and light dynamite on rock 4
- (If repeating) Pick up blasted ore from rock 4
- Excavate and place dynamite on rocks 5 and 6
- Light dynamite on rocks 5 and 6
- (If repeating) Pick up blasted ore from rocks 5 and 6
- Excavate, place, and light dynamite on rock 7
- (If repeating) Pick up blasted ore from rock 7
- Excavate, place, and light dynamite on rock 8
- (If repeating) Pick up blasted ore from rock 8
- (If repeating) Deposit in the sack
- (Every 3rd cycle) Bank or un-note to withdraw more dynamite and potions
- Repeat
The first cycle skips picking up ore and depositing, as the pattern is designed to pick up the ore from the previous cycle. Every cycle after the first will include picking up ore and depositing.
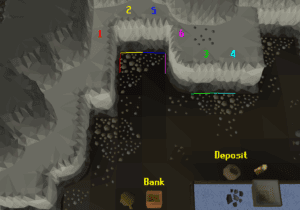
North-east
This pattern uses the north-east corner, depositing 20 blasted ore after 2.5 cycles. This pattern is highly efficient and offers some margin for error. This pattern can yield up to 380 blasted ore mined per hour at maximum efficiency, including banking every 2.5 cycles.[2]
Using the image as a reference, numbering tiles 1-4 right-left:
- (If ore is ready) Pick up blasted ore on tile 1
- Excavate and place dynamite on rocks adjacent to tile 1
- Light dynamite on rocks adjacent to tile 1
- (If ore is ready) Pick up blasted ore on tile 2
- Excavate and place dynamite on rocks adjacent to tile 2
- Light dynamite on rocks adjacent to tile 2
- (Every 5 cycles, starting at 2.5)
- Pick up blasted ore on tiles 3, 4, 2, 1, in that order
- Deposit in the sack
- Bank or un-note to withdraw more dynamite and potions
- (If ore is ready) Pick up blasted ore on tile 3
- Excavate and place dynamite on rocks adjacent to tile 3
- Light dynamite on rocks adjacent to tile 3
- (If ore is ready) Pick up blasted ore on tile 4
- Excavate and place dynamite on rocks adjacent to tile 4
- Light dynamite on rocks adjacent to tile 4
- (Every 5 cycles, starting at 5)
- Pick up blasted ore on tiles 1, 2, 3, 4, in that order
- Deposit in the sack
- Bank or un-note to withdraw more dynamite and potions
- Repeat
This pattern can be altered to deposit and bank every 2.75 cycles, providing increased efficiency[confirmation needed] and no margin for error.
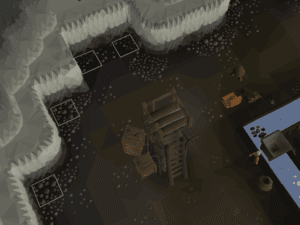
North-west 6-rock
This pattern uses the north-west corner, depositing six blasted ore with each cycle. This pattern offers ample time to move to the next spot to avoid damage, and picking up the ore often allows for extended breaks. This pattern can yield up to 362 blasted ore mined per hour at maximum efficiency, including banking every 4 cycles.
Using the image as a reference:
- Excavate and place dynamite on rocks 1 and 2
- Light dynamite on rocks 1 and 2
- Excavate and place dynamite on rock 3
- Excavate and place dynamite on rock 4
- Light dynamite on rock 4
- Light dynamite on rock 3
- Excavate and place dynamite on rocks 5 and 6
- Light dynamite on rocks 5 and 6
- Pick up blasted ore from rocks 3, 4, 1, 2, 5, 6, in that order
- Deposit in the sack
- (Every 4th cycle) Bank to withdraw more dynamite and potions
- Repeat
With perfect timing, you will arrive at rock 3 at the same time that it regenerates.