This page shows various strategies which may help you in the Barrows.
Getting there
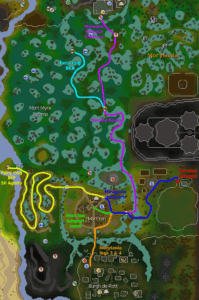
* (Blue, Green and Orange) Using the Mort’ton minigame teleport, Mort’ton teleport scroll and Morytania legs 3 & 4 are good alternatives to players who don’t have access to the Barrows teleport.
* (Pink and Light blue) Travelling using the swamp boaty is a valid method for ironmen who don’t have access to abovementioned options.
* (Yellow) Using the BIP fairy ring is the longest of the routes, but takes the player close to the Nature Grotto, which players can visit to restore their Prayer points.
There are several different methods for travelling to Barrows. The best options, ordered from fast to slow, are:
- Casting Barrows Teleport in the Arceuus spellbook, which requires 83 Magic, or using a Barrows teleport tablet will teleport the player right next to the entrance.
- Alternatively, a portal can be built in the portal chamber or portal nexus of a player-owned house that is connected to the Barrows teleport. This requires level 50 Construction or higher.
- Using a Mort’ton teleport scroll and then running east to Barrows.
- Using the Grouping interface to teleport to Shades of Mort’ton. This requires completion of the quest Shades of Mort’ton. This method is free and takes up no inventory or equipment spaces, though there is a 20-minute cooldown between uses.
- Using the Morytania legs 3 or 4 to teleport to Burgh de Rott and running north through Mort’ton towards Barrows.
- Using the fairy ring code BKR and running south-east until reaching the swamp boaty, then using the travel option to travel to Mort’ton. Run east from here.
- Kharyrll Teleport (requires completion of Desert Treasure I) to Canifis, use the Myreque Hideout shortcut south of the pub and run south to cross the rope bridge. Continue running south until reaching the swamp boaty, then use the travel option to travel to Mort’ton. Run east from here.
- At 50 Agility, players can use the fairy ring code BIP, go east, and south, following the path through Mort’ton.
- Run east from Canifis, then south through the swamp. Turn east at the northmost hunter spot, loop around to the other nearby hunter spot, then run south-west to the swamp exit.
Requirements
- Completion of Priest in Peril is required to enter Morytania.
Recommendations
Quests
- Partial completion of
 Fairytale II – Cure a Queen for access to fairy rings.
 - Completion of Shades of Mort’ton for access to the Shades of Mort’ton minigame grouping teleport.
- Completion of In Aid of the Myreque for access to the bank in Burgh de Rott.
- Completion of Underground Pass for access to Iban’s staff if you don’t have access to a trident of the swamp or trident of the seas.
Skills
- 50+ Attack
- 50+ Strength
- 50+ Defence
- 50+ Ranged (if ranging Ahrim)
- 50+ Magic (For Iban Blast and higher level wind spells)
- 43+ Prayer (For access to protect from melee, missiles, and magic)
- 50+ Agility (To reduce run energy drain getting to the Barrows)
- 45+ Construction (For POH altars and restoration pools)
Miscellaneous
- Completion of the Morytania Hard Diary for unlimited teleports to Burgh de Rott and 50% more runes from every chest opened at Barrows.
- Claimed the medium tier rewards from the Combat Achievements system for Ghommal’s hilt 2 or higher, which nullifies the Prayer-draining effect at Barrows.
Exploring the Barrows
Introduction
Players can take on the Barrows brothers and loot their crypts in order to find valuable treasures. Read this section for a quick summary on how to take on this challenge. For more strategy tips, visit the sections below.
Entering the crypts
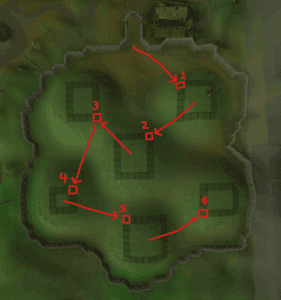
The above-ground portion of Barrows consists of six burial mounds inside a stone fence. Digging with a spade on top of these mounds will land the player inside a crypt belonging to one of the brothers.
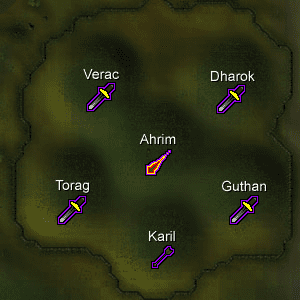
- Ahrim’s mound is located in the centre.
- Dharok’s mound is located north-east.
- Guthan’s mound is located south-east.
- Karil’s mound is located south.
- Torag’s mound is located south-west.
- Verac’s mound is located north-west.
These mounds are also labelled in the downloadable tile markers below.
Killing the Barrows brothers
| Barrows brother | Attack style | Vulnerabilities | |
|---|---|---|---|
 |
Ahrim the Blighted | ||
 |
Dharok the Wretched | ||
 |
Guthan the Infested | ||
 |
Karil the Tainted | ||
 |
Torag the Corrupted | ||
 |
Verac the Defiled | ||
Searching the sarcophagi within the crypts will spawn one of the Barrows brothers’ wights (or will lead to a passage beneath the crypts, see section below). Kill these NPCs to become eligible to find Barrows equipment in the rewards chest. Use the staircases to exit the crypts and continue by digging somewhere else. If one of the brothers has spawned in a crypt, leaving before the brother is killed will despawn them, and the brother will have to be fought again at full health when the sarcophagus is searched upon returning.
The table to the right shows the attack style each Barrows brother is vulnerable to. Additionally, all of the Barrows brothers have a 50% elemental weakness against air, making Wind spells an effective way of killing them.
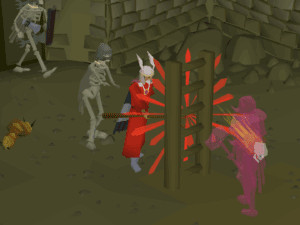
While underground anywhere in the Barrows area, the brothers’ faces will occasionally appear on-screen, draining a considerable amount of Prayer points every 18 seconds. The amount of Prayer drained begins at eight Prayer points, and increases by one for each brother killed, for a maximum of fourteen once all six brothers are killed. Since the area Prayer drain is so significant you ought to take several steps to speed up your kills and minimise the time you spend underground in order to save on Prayer potions and thus maximise profits. This effect can be nullified by equipping Ghommal’s hilt 2 or higher. It only needs to be wielded just before the drain effect activates, so one can keep a timer to track when this will occur and switch to a stronger offhand.
Praying Eagle Eye or Rigour against Ahrim when using ranged will always speed up kills, as well as praying Chivalry, Piety, or Incredible Reflexes and Ultimate Strength when using Melee against Karil. The idea is that using combat boosting Prayers will drain less Prayer points than the area effect. Using Protection Prayers also means you don’t have to spend time consuming food and can instead damage your opponent, further reducing area Prayer drain. Try to drink your Prayer potions and eat your food while above ground.
Players should use Protection Prayers to negate as much damage as possible from these NPCs. Verac has a 25% chance to hit through Protection Prayers, while the rest will have their damage fully negated.
- Protect from Magic against Ahrim.
- Protect from Melee against Dharok, Guthan, Torag, and Verac.
- Protect from Missiles against Karil.
Navigating the tunnels
Searching the sarcophagus within one of the crypts leads to a passage into the Barrows tunnels beneath the crypts, which contains the Barrows rewards chest. The crypt giving access to these tunnels is chosen at random each time. If you happen to find this crypt before killing the other five brothers, it is recommended to leave and kill the others unless you are hunting for a specific brother’s equipment.
These tunnels can be navigated by passing through a series of doors. Upon opening any of the doors in these tunnels, a monster will spawn and attack the player. There is a 12/128 chance it will be any of the remaining Barrows brothers, 52/128 it will be a skeleton, 32/128 for a bloodworm, and 32/128 chance a crypt rat to appear. However, not all of the doors in these tunnels can be opened, thus players should try to find their way through the doors leading to the middle room with the rewards chest. When opening a door to a room that already contains eleven enemies or more, no new monster will be spawned.
With the strange old lockpick, players can ignore the random path and head straight into the middle room, making trips faster at the cost of a charge when passing through a locked door. Since the player has to kill monsters for the maximum reward potential, it is usually not recommended to use the lockpick unless looking for fast loots.
Gathering rewards potential
| Monster name | Combat level | |
|---|---|---|
| Crypt rat | 43 | |
| Bloodworm | 52 | |
| Crypt spider | 56 | |
| Giant crypt rat | 76 | |
| Skeleton | 77 | |
| Giant crypt spider | 79 | |
The chance of finding pieces of Barrows armour or weapons is determined by the number of brothers the player has killed before opening the chest. The nature and amount of other rewards, mainly consisting of runes, is determined by the player’s reward potential. Generally, a higher reward potential will reward the player with more costly runes, in higher quantities.
Players can gather reward potential by killing the Barrows brothers and the monsters inside the crypts. The reward potential gathered is equal to the combat level of the monster that was slain, capped for a total of 1,000. For every Barrows brother that was slain, the player will receive an extra 2 points on their rewards potential, capping the maximum reward potential at 1,012.
These monsters located in the tunnels are listed in the table on the right.
Entering the rewards chest’s room
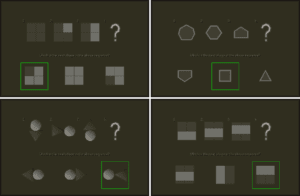
The door that leads to the central room will be locked with a simple pattern puzzle, which can be one of four types and must be solved in order to pass through. The solutions to all types of door puzzles are shown here. Keep in mind that the answers shown here are always given but may not be in the same order each time.
If you get the puzzle wrong, the doors and rooms within the tunnels will shift around, meaning that the exit ladder will be in a different room and the doors that can be opened will be in a different arrangement. This means the player has to continue exploring the tunnels until they once again find the door that leads to the central room.
Opening the rewards chest
Upon opening the chest, the brother whose crypt the player entered will appear and start attacking the player, if he did not already appear while travelling through the tunnels. It is not required to kill the Barrows brother in order to loot the chest. However, keep in mind that the chance of getting Barrows equipment from the chest increases as more brothers are killed, and players will not be able to receive equipment belonging to brothers they did not kill.
Once the chest is open, click it again to loot it. An interface will appear showing the rewards, which will go into the player’s inventory (or be dropped on the ground, if the inventory is full) once the window is closed.
At this point, the challenge is complete, and the player can escape the tunnels or teleport out to start again.
Once the chest is looted, the tunnels will shake and start to collapse, causing occasional damage to the player, and the arrangement of the doors and rooms will shift, meaning the room you entered in may not be the same as the room that now contains the ladder you must take to leave. Moreover, as you attempt to escape the tunnels after looting the chest, each door you open is guaranteed to summon one of the brothers whom you did not kill on that run. Killing them is not recommended as they will not count towards the next run.
Once the player leaves the tunnels after looting the chest, the Barrows will be reset: brothers will once again be in their crypts, and the location of the tunnels within the crypts and its layout of doors is re-randomised. You can then go to bank or heal, or go right back into the crypts for another attempt. Note that your progress is saved if you log out or leave the area before looting the chest.
Equipment
Magic can be used effectively against each Barrows brother. However, Ahrim is weakest to ranged and will be harder to hit without Air spells or a Tumeken’s shadow.
|
|
| Slot | Recommended equipment for Magic equipment – Item (most effective → least effective) | ||||
|---|---|---|---|---|---|
| N/A | N/A | ||||
| N/A | N/A | N/A | |||
| N/A | N/A | ||||
| N/A | N/A | N/A | |||
| N/A | N/A | ||||
| N/A | N/A | ||||
| N/A | N/A | ||||
| N/A | N/A | N/A | N/A | ||
Inventory
- With a 1-handed staff, a Ghommal’s hilt 2 or better can replace a magic offhand if you wish to avoid the prayer drain effect.
- Range equipment for Ahrim. With Air spells or a Tumeken’s shadow this can be skipped for fewer equipment switches.
- Melee equipment for melee special attacks or getting reward potential.
- A saturated heart or other magic potion will boost powered staves considerably.
- Super combat and Ranging potions will speed up killing Ahrim and Karil.
- Use the rune pouch to store any mind, chaos, death and blood runes in.
- A Spade to enter the crypts.
- Teleport to house tablets could be replaced by a Construction cape or max cape.
- Barrows teleport tablets could be replaced with the barrows teleport in the Portal Nexus.
- Bringing a Strange old lockpick helps speed up runs by skipping through any doors in the crypts.
Tank armour is very effective at reducing damage from the crypt monsters while not severely reducing magic accuracy against the brothers. Without magic armour, you will need a range or melee weapon to defeat Ahrim quickly.
|
|
| Slot | Recommended equipment for Tank & Lower level – Item (most effective → least effective) | ||||
|---|---|---|---|---|---|
| N/A | |||||
| N/A | |||||
| N/A | |||||
| N/A | |||||
| N/A | N/A | N/A | N/A | ||
| N/A | N/A | ||||
| N/A | N/A | ||||
| N/A | N/A | N/A | |||
Inventory
- If your Ranged level is high enough, bring Dragonhide armour and a ranged weapon for Ahrim.
- Use a melee weapon to kill monsters in the tunnels for reward potential.
- A Dragon dagger for quickly killing Ahrim.
- Food for healing from Verac or the crypt monsters.
- Prayer potions
- Combat and Ranging potions
- Runes for Air spells or Iban Blast.
- Use the dueling ring to teleport to Ferox Enclave after each run, to bank and use the Pool of Refreshment to restore your stats. Otherwise bring a ring to boost your melee attacks for getting reward potential.
Without a Shadow or Air spells, Ahrim is easiest to defeat with ranged attacks. A Blowpipe, Magic shortbow, or Karil’s crossbow are common weapons to use. Use your special attacks on Ahrim to speed up the fight, as he can drain your other combat stats the longer the fight continues.
| Slot | Recommended equipment for Ranged (Ahrim) – Item (most effective → least effective) | ||||
|---|---|---|---|---|---|
| N/A | N/A | N/A | |||
| N/A | |||||
| N/A | |||||
| N/A | |||||
| N/A | |||||
| N/A | N/A | N/A | N/A | ||
| N/A | N/A | N/A | N/A | ||
| N/A | N/A | ||||