Lizardman shamans are popular monsters hunted by players for their renowned dragon warhammer drop, which has a useful special attack for high level PvM encounters. This guide will give a few tips and some setups to help out with your kills.
Location
Lizardman shamans can be found in three locations:
- Western side of the Lizardman Canyon – contains three shamans in a large, multi-combat area.
- Lizardman Caves on the northern end of the Lizardman Settlement – contains eight shamans in a small, single-way area, with two shamans in each room. These can only be killed while on a lizardman Slayer task.
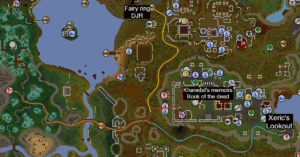
- Lizardman Temple beneath Molch – contains six shamans in a small, single-way area, with two shamans in each room.
Attacks
Lizardman shamans use the following attacks:
- Melee attack – a standard melee attack sharing the same animation as the other lizardmen.
- Ranged attack – a standard ranged attack sharing the same animation as the other lizardmen. This attack can poison.
- Special attacks – Lizardman shamans have three special attacks that can be used without cooldown:
- Acid spit – The shaman spits a large ball of acid at the player’s current location. This will deal unblockable poison damage for up to 30 damage. This attack can poison. The damage reduces if you wear a full set of Shayzien armour, obtained from fighting the soldiers in the Combat Ring. Wearing the full tier 5 Shayzien set negates all damage done by this attack, though you can still be poisoned.
- Jump – The shaman jumps into the air before crashing down at the player’s location when they jumped. This can be avoided by moving out of the way. If the shaman stomps you, you will take heavy damage which cannot be blocked.
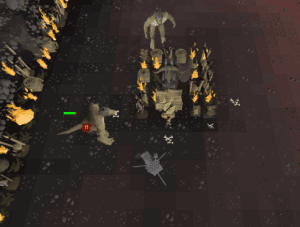
- Spawns – The shaman summons three spawns – two next to the player and one under the player, who will follow the player upon spawning, unless the spawns are summoned in a position where they cannot see the player. After several seconds, the spawn will explode, dealing 8-10 damage to players that are two spaces or less from it when it explodes. The minion who spawns under the player will always explode first.
Lizardman shamans have an attack range of 8, which means that weapons like longbows, composite bows, the crystal bow, and the Bow of faerdhinen can outrange it on rapid, and weapons like shortbows, crossbows, and Karil’s crossbow can outrange it on longrange.
Suggested skills
 80+
80+- 80+
- 20+ (60+ Recommended)
- 60+
- 40+ (43+ Recommended)
Equipment
Using Ranged is recommended as this allows better manoeuvring, although Melee is also viable. Lizardman shamans are weak to both combat styles; specifically, they have negative stab defence and no ranged defence bonuses. Slash, crush and magical attacks are not recommended as they have high defensive bonuses against those styles.
If killing lizardman shamans on task, it is strongly recommended to have completed the hard Kourend & Kebos Diary to add the Shayzien armour effect to your Slayer helmet via Captain Cleive. Warning: This will not happen automatically! You need to actively speak with Captain Cleive to trigger the change. If you do not have the diary completed, you will take some damage from the acid spit attack if wearing the Slayer helmet, and it can deal a lot of damage over time.
If you have not completed the diary, it’s best to wear the Shayzien helm (5) regardless of combat class.
Range
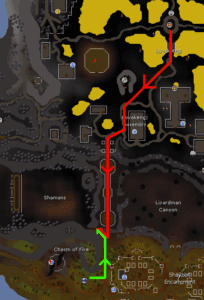
Activate Protect from Missiles and your best offensive prayer, and if using, set up your dwarf multicannon in the north-west corner near the obstruction in Lizardman Canyon as indicated in the image above. Focus primarily on killing the north-west and south-west spawns. Always pay attention to all special attacks, namely leaping and summoning minions. Move out of the way as soon as you see them jump, and dodge the minions by manoeuvring around an obstacle or moving a few spaces away. As a ranger, always keep distance, and work the obstacles. Note that hugging the obstacle or wall in the canyon prevents the shamans from jumping. As for the shaman temple, only the western and southern walls will prevent them from jumping.
| Slot | Recommended equipment for Ranged – Item (most effective → least effective) | ||||
|---|---|---|---|---|---|
| N/A | N/A | N/A | |||
| N/A | N/A | N/A | N/A | ||
| N/A | N/A | N/A | N/A | ||
| None if using two-handed weapons. | |||||
| N/A | N/A | N/A | N/A | ||
| N/A | N/A | N/A | N/A | ||
Lizard Canyon
Inventory
- 2 Divine ranging potions
- 1 Antidote++ or 2 Superantipoisons or Araxyte venom sacks
- 1-2 Stamina potions (optional, can be substituted for extra prayer potions or food if the player doesn’t move a lot)
- 6-8 Prayer potions
- Dwarf multicannon and cannonballs
- Rune pouch with nature, lava and water runes to cast High Level Alchemy and Bones to Peaches (optional but strongly recommended)
- Bones to peaches (tablet) (optional but not needed if spell is unlocked and bringing said runes)
- Xeric’s talisman
- An emergency teleport
- Holy wrench to increase the effectiveness of your prayer restoring items
- Rest monkfish or better
Lizard Settlement
Inventory
- 2 Divine ranging potions
- 1 Antidote++ or 2 Superantipoisons or Araxyte venom sacks
- 1 Stamina potion (optional)
- 6-8 Prayer potions
- Rune pouch with nature, lava and water runes to cast High Level Alchemy and Bones to Peaches (optional but strongly recommended)
- Bones to peaches (tablet) (optional but not needed if spell is unlocked and bringing said runes)
- Xeric’s talisman
- An emergency teleport
- Holy wrench to increase the effectiveness of your prayer restoring items
- Rest monkfish or better
Lizardman Temple
Inventory
- 2 Divine ranging potions
- 1 Antidote++ or 2 Superantipoisons or Araxyte venom sacks
- 1 Stamina potion (optional)
- 6-8 Prayer potions
- Rune pouch with nature, lava and water runes to cast High Level Alchemy and Bones to Peaches (optional but strongly recommended)
- Bones to peaches (tablet) (optional but not needed if spell is unlocked and bringing said runes)
- Xeric’s talisman
- An emergency teleport
- Holy wrench to increase the effectiveness of your prayer restoring items
- Rest monkfish or better
Melee
Activate Protect from Melee, and if using, set up your dwarf multicannon north-west by the obstruction in Lizardman Canyon, or set up your cannon in the open area south-west. Always pay attention to all special attacks, namely leaping and summoning minions regardless. Move out of the way as soon as you see them jump, and dodge the minions by manoeuvring around an obstacle or moving a few spaces away. If using the noxious halberd, stand one tile away, allowing you to avoid the melee attacks and pray Protect from Ranged.
| Slot | Recommended equipment for Melee – Item (most effective → least effective) | ||||
|---|---|---|---|---|---|
| N/A | N/A | N/A | |||
| N/A | N/A | N/A | N/A | ||
| N/A | N/A | N/A | N/A | ||
(On stab) |
(on stab) |
||||
| N/A | N/A | ||||
| N/A | N/A | N/A | |||
| N/A | N/A | N/A | N/A | ||
| N/A | N/A | N/A | N/A | ||
(For healing) / |
(On stab) |
||||
- Full tier-5 Shayzien armour will nullify the shamans’ acid.
- Use with Bonecrusher for longer trips.
- Use with Scythe
Lizard Canyon
Inventory
- Special attack weapon
- 1-2 Divine super combat potions
- 1-2 Superantipoisons or Antidotes or Araxyte venom sacks
- 3-4 Prayer potions (6-8 if using Piety)
- Rune pouch with nature, lava and water runes to cast High Level Alchemy and Bones to Peaches (optional but strongly recommended)
- Dwarf multicannon and cannonballs (optional)
- Xeric’s talisman
- An emergency teleport
- Rest monkfish or higher
Lizardman Settlement/Temple
Inventory
- Special attack weapon
- 1-2 Divine super combat potions
- 1-2 Superantipoisons or Antidotes or Araxyte venom sacks
- 3-4 Prayer potions (6-8 if using Piety)
- Rune pouch with nature, lava and water runes to cast High Level Alchemy and Bones to Peaches (optional but strongly recommended)
- Bones to peaches (tablet) (optional but not needed if spell is unlocked and bringing said runes)
- Xeric’s talisman
- An emergency teleport
- Holy wrench to increase the effectiveness of your prayer restoring items (unnecessary if wearing a Ring of the gods (i))
- Rest monkfish or higher
