
The Wintertodt can be fought with 50 Firemaking, an axe, and a tinderbox.
Equipment
- An axe is required to chop bruma roots. Players with at least level 46 Woodcutting can use as low as a steel axe and still maintain maximum cut speed.[1][2][3] An inventory space is saved by wielding the axe.
- A tinderbox or bruma torch is required to relight the braziers, and an inventory space may be saved by wielding the torch in either hand.
- A knife can optionally be used to fletch the roots, yielding modest Fletching experience and more points when added to a brazier, at the cost of lower rate of Firemaking experience.
- A hammer is required if the player intends to repair shattered braziers, which grants a fair amount of Construction experience. An Imcando hammer may be wielded in either hand to save an inventory space.
- At least 4 pieces of warm clothing. The clue hunter outfit is an option easily obtained by any player. Pieces of the pyromancer outfit are preferred once the player has obtained them, as in addition to being warm clothing, they also offer an experience bonus.
- Unfinished potions from the crates can be made into rejuvenation potions to restore warmth or heal the Pyromancers (only required by one or two people per brazier if playing in a large group).
- Food is only necessary if not using rejuvenation potions to restore warmth.
- Regen bracelet and/or Hitpoints cape for mid to late-game players (optional). Using both of these items in conjunction with four pieces of warm clothing can entirely cancel out the need to restore warmth.
Wintertodt’s attacks
The Wintertodt has three attacks that can damage the player, as well as two other actions that interfere with defeating it:
- Standard attack – All individual players will take periodic damage while outside of the safe area. The damage taken is based on the player’s total Firemaking level, and is drastically reduced while wearing warm clothing to a minimum of around 10-15% of the player’s warmth meter. This damage has a cooldown of 10 ticks (6 seconds). It will interrupt fletching and feeding braziers, but does not interrupt chopping bruma roots.
- Area attack – Heavy snow will occasionally appear over a 3×3 area centred on a specific player as a warning, then fall to the ground causing damage to all players currently in the 3×3 area. This can be easily avoided by watching out for the snow and stepping out of the area. If not avoided, it will deal roughly double the damage done by the periodic standard attack. This attack cannot target any player that is standing next to an obstacle, though such a player may fall within the 3×3 range of someone else near them. There are also several spots (notably the ones next to the bruma roots) where a snowfall cannot occur due to not having a 3×3 space available.
- Brazier heavy attack – Heavy snow will occasionally appear over a brazier as a warning, then the brazier will shatter. Players standing directly next to a brazier when it shatters will take the same amount of damage as if snow had fallen on them.
- Brazier light attack – Light snow will occasionally appear over on a brazier as a warning, then it will extinguish. This does not cause damage.
- Pyromancer attack – Light snow will occasionally appear over an individual pyromancer as a warning, then she will take damage. This is not dangerous to other players.
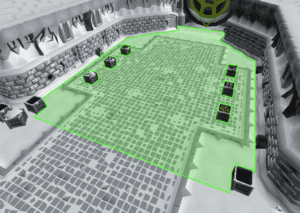
The area shown in the image is safe, and none of the Wintertodt’s attacks will damage the player within this zone. Players cannot fletch here; however, they can make rejuvenation potions.
The frequency of these attacks significantly depends on the Witertodt’s remaining energy. Standard attacks will happen a normal amount at first (100-60% energy), and then occur very rarely near the end of each round (20-0% energy). Brazier and pyromancer attacks will happen very rarely at first (100-80% energy), and then occur a normal amount near the end of each round (40-0% energy). Specifically:
- When the Wintertodt attempts to do a standard attack, a random number between zero and the maximum energy of the Wintertodt is picked, which is then compared against its current energy. If the randomly picked number is lower, the attack will proceed, making them more frequent at higher energy levels.[4]
- When the Wintertodt attempts to attack one of the braziers or pyromancers, a random number is rolled up to the Wintertodt’s maximum energy, and compared against its remaining energy. If the randomly rolled number is higher, an attack against a brazier or pyromancer goes through, making them more frequent at lower energy levels.
The following formulas can be used to determine the amount of damage taken, rounded down.
| Attack type | Formula |
|---|---|
| Standard attack | 1×⌊(16−W−min(2×B,6))×(100)FM⌋ |
| Brazier attack | 2×⌊(10−W)×(100)FM⌋ |
| Area attack | 3×⌊(10−W)×(100)FM⌋ |
|
|
Wintertodt’s energy
The Wintertodt’s energy meter is lowered by the pyromancers sending green magic bolts from the braziers toward the storm in the center of the prison. Each pyromancer is capable of weakening the Wintertodt by 1% energy every 14 ticks (8.4s) for a total of 1% every 3.5 ticks (2.1s) on average with all four braziers lit. This would make a game take 3 minutes and 30 seconds if not a single brazier is ever attacked and extinguished (which is nearly impossible). You could equivalently imagine that the Wintertodt is a boss with 700 Hitpoints and each green bolt fired by a pyromancer deals 1 Hitpoint of damage. Fueling the braziers with bruma roots or bruma kindling does not cause the fight to progress any faster.
If all four braziers are allowed to go out, the Wintertodt will restore energy at a rate of 1% every 35 ticks (21s) beginning with a random delay. For example, it could gain 1% energy 2 ticks after the final brazier is extinguished, and then every 35 ticks after that. If at least one brazier is lit, the Wintertodt will not restore any energy.
Each time a brazier is relit or a downed pyromancer is healed, there will be a short random delay (roughly 1-5 seconds) before the pyromancer resumes attacking. An active pyromancer can safely drop to 0 health as long as she is healed on the same tick as she takes the damage; this can roughly double the amount of healing for each dose of rejuvenation potion if timed perfectly. If she is allowed to have 0 health for one or more ticks, there can sometimes be another short random delay (roughly 1-5 seconds) before she resumes attacking.
General efficiency tips

No matter what your strategy is, lighting braziers is always worthwhile in both Firemaking xp and points, even if it means interruping root cutting or fletching to run over and light it. Multiple players can repair or light a brazier at once, and all players who begin the animation before the brazier changes state will receive the full xp.
When going for maximum Firemaking experience by feeding bruma roots to the brazier without fletching, taking a rejuvenation potion with you for a quick 75 points per dose healing a pyromancer can be very helpful to make sure you hit the 500 point mark when rounds go fast. Note that unlike fixing braziers, only one player can heal a pyromancer, so you will be competing with others to do so.
While relighting or repairing a brazier takes 4 ticks, other actions can be started before the animation has completed. For example, you can begin repairing the brazier and then click on food to heal during repairing the brazier, or relight the brazier and immediately use a knife on a log to fletch. You can also click to begin moving early on the final tick of repairing or lighting a brazier. The brazier can be repaired or lit during the final tick of movement towards it, so standing 1 square away (or 2 while running) is no less efficient than standing directly next to it. Using both of these tips, the time to light a brazier is effectively cut in half (to 2 ticks) when running from a bruma root and then back again.
You can fletch while running, combine rejuvenation potions while running, or have Brew’ma instantly combine all potions in your inventory at once.
Using tick manipulation you can speed up the first log received from bruma roots: for example, click to run toward the roots from the brazier, then immediately use your knife on some teak logs, then click the roots again and your first log will be instant.
Large groups
Equipment
|
|
It is preferable to equip four warm items in slots that will not interfere with other useful equips. If available, you should bring any pieces of the pyromancer outfit to increase experience and a bruma torch to replace your tinderbox. You should equip a wieldable axe that will get you closest to maxing out your cut speed on the bruma roots (note that the Infernal axe counts as a warm item and will not use charges on bruma roots). Health regeneration boosts, such as from a regen bracelet or Hitpoints cape, or prayer gear to increase the duration of the Rapid Heal prayer will aid in passive warmth regeneration.
Strategy
During the fight, pay attention to your warmth meter and the area around you, making sure to eat food or drink a rejuvenation potion if your warmth gets too low. The Wintertodt can perform a powerful snowfall attack in a 3×3 area, which deals high damage to your warmth. If snow begins to fall, be sure to avoid the affected area.
Upon entering the Wintertodt lobby, if you did not bring your own food to restore warmth, take one or more rejuvenation potions (unf) from the crates and bruma herbs from the sprouting roots found on the east or west walls of the lobby area. If you have Druidic Ritual complete, combine unfinished potions with the herbs to make rejuvenation potions; otherwise, go to Brew’ma to make them for you. Restock on potions from the lobby or food from the bank chest outside Wintertodt during the respawn timer between games.
Immediately when the Wintertodt’s energy bar turns green at the start of the fight, light one of the braziers with a tinderbox (you can immediately do so when the respawn timer hits 0:00). This will start off the fight with 25 points towards the 500 required. You will also receive Firemaking experience (Firemaking level * 6) which is more efficient than simply chopping more logs. The brazier should be relit immediately any time it is extinguished while you are nearby, as the points and xp are always worthwhile (even if it interrupts cutting or fletching) and an unlit brazier will make the round last longer.
When your inventory is full of roots, either fletch them or begin adding them to the lit braziers. Each root added to a brazier will provide 10 points and some Firemaking experience (Firemaking level * 3).
Fletching the roots into kindling is only recommended for gaining points and not Firemaking experience, because the amount of time it takes to fletch causes it to be slower overall experience. Fletching requires a knife and provides Fletching experience (Fletching level * .6). Adding the kindling provides 25 points and will give 30% more Firemaking experience than roots. The best place to stand while fletching is either hugging the wall right next to the bruma roots (to avoid the 3×3 attack) or 2 squares away from a brazier (so you can react quickly if it is broken or extinguished, while staying out of range from the shrapnel).
Broken braziers are fixed extremely quickly on Wintertodt worlds, so you will have to click on it quickly after it is broken if you want to gain Construction experience. It can then be relit after it is fixed (unless the pyromancer is down, in which case your best option is to heal the pyromancer yourself, run towards another brazier, or fletch while you wait for someone else to heal the pyromancer).
Make sure to gain at least 500 points during each round to be eligible for the reward and experience. The time to subdue on a Wintertodt world averages about 5 minutes, including both the fight and wait time between each round. The waiting time between each round is 60 seconds.
While waiting between rounds, some players may wish to train Agility by hopping back and forth across the pillars. With a flat 18 xp per hop, this would provide 36k Agility xp/hour, but because this method is only allowed during the 1 minute between rounds, the effective rate is 7k Agility xp/hour or less.
World hopping for maximum Firemaking experience
This method allows maximum experience rates to be achieved by taking advantage of the bonus experience awarded for successfully subduing the Wintertodt. After subduing the Wintertodt, world hop to the next available official Wintertodt world with 50% or more energy. (It is possible to achieve the minimum 500 points whilst starting from 40% energy, but not reliably. It is also possible to crash solo games instead of official worlds, but this will result in less xp per hour than playing normally.)
Chop roots as normal, and immediately fix/light the brazier if it is broken or extinguished. Fletch all available roots while standing at the brazier, burn the kindling, and repeat. Bonus experience does not scale based on points, so once you have reached 500 points, use the remaining time to either continue fletching and aim for more points (for additional reward rolls) or just burn roots (for maximum Firemaking experience).
Whilst this method requires more focus, with good world syncing and consistent successful kills, it is possible to achieve up to twice as many kills per hour compared to camping one world. The increased kills per hour and decreased downtime allows for significantly higher experience rates (up to 452k per hour at level 99). Reward rolls per hour are comparable with the solo method below.
These rates are only theoretical, as they are difficult to achieve reliably in practice. Depending on how many players are online, worlds may quickly become out of sync.
Players will gain up to 2,000 Construction experience an hour at level 99 Construction from fixing the brazier, scaling proportionally to player’s Construction level.
A player will need to subdue the Wintertodt around 670 times to achieve 99 Firemaking using bruma kindling (based on a player earning 800 points per kill). Comparatively, a player must subdue the Wintertodt roughly 540 times to achieve 99 Firemaking using bruma roots.
Experience
Group experience (no fletching)
Players can expect to earn 600-750 points per game with this strategy (not including any healing of pyromancers), resulting in at least 28 rewards per hour.
| XP/h | XP/h | |||
|---|---|---|---|---|
| 50 | 177,000 | 50 | 11,000 | |
| 60 | 212,000 | 60 | 13,000 | |
| 70 | 247,000 | 70 | 15,000 | |
| 80 | 283,000 | 80 | 17,000 | |
| 90 | 318,000 | 90 | 19,000 | |
| 99 | 350,000 | 99 | 21,000 | |
Group experience (fletching)
Players can expect to earn 850-1050 points per game with this strategy (not including any healing of pyromancers), resulting in at least 35 rewards per hour.
| XP/h | XP/h | XP/h | |||||
|---|---|---|---|---|---|---|---|
| 50 | 146,000 | 50 | 6,000 | 50 | 12,000 | ||
| 60 | 176,000 | 60 | 7,000 | 60 | 15,000 | ||
| 70 | 205,000 | 70 | 8,000 | 70 | 17,000 | ||
| 80 | 234,000 | 80 | 10,000 | 80 | 19,000 | ||
| 90 | 264,000 | 90 | 11,000 | 90 | 22,000 | ||
| 99 | 290,000 | 99 | 12,000 | 99 | 24,000 | ||
Group experience (world-hopping)
These rates are only theoretical, as they are difficult to achieve reliably in practice. 24 games per hour at 500 points per game would result in 48 rewards per hour.
| XP/h | XP/h | XP/h | |||||
|---|---|---|---|---|---|---|---|
| 50 | 228,000 | 50 | 8,000 | 50 | 15,000 | ||
| 60 | 274,000 | 60 | 9,000 | 60 | 18,000 | ||
| 70 | 319,000 | 70 | 11,000 | 70 | 21,000 | ||
| 80 | 365,000 | 80 | 12,000 | 80 | 24,000 | ||
| 90 | 411,000 | 90 | 14,000 | 90 | 27,000 | ||
| 99 | 452,000 | 99 | 15,000 | 99 | 30,000 | ||
Solo method
As compared to the group method, soloing the Wintertodt typically grants more reward rolls, more Construction xp, and less Firemaking xp per hour. It also requires less attention since action-interrupting standard attacks will occur less frequently, and games last much longer which makes the 500 point reward threshold more forgiving to interruptions such as stepping away from the keyboard for a few minutes. Mass worlds can also be distracting when playing on clients such as mobile that cannot hide other players.
Solo strategies can also be done in duos or small teams, which can improve Firemaking xp efficiency if not fletching, but can reduce points per hour if fletching and healing.
Requirements
- Level
 50 is required to participate in the Wintertodt fight.
 - Owning a player-owned house is recommended to receive experience from repairing broken braziers.
- Level 60+ is recommended to use the northern gap-jump shortcut as well as providing more run energy for moving between braziers.
Equipment
The following section will assume that the goal of the player is to maximise reward rolls at the cost of some Firemaking experience.
| Slot | Recommended equipment for Solo – Item (most effective → least effective) | |
|---|---|---|
| N/A | ||
4 warm items should be equipped at all times throughout the fight. In addition, weight-reducing clothing such as camouflage Hunter gear (which also counts as Warm clothing) or pieces of the graceful outfit can significantly increase your efficiency, as the beginning and end of each round typically require lots of running.
Ironman accounts can easily obtain 4 warm items by obtaining the clue hunter boots and gloves, available north of Ardougne near the Fishing Guild, and the rainbow jumper and rainbow scarf, available for free by speaking to Gilbert south-east of Barbarian Village.
Having as many free inventory spaces as possible will reduce the amount of trips needed between the bruma root and brazier. It will also allow you to carry more rejuvenation potions at the beginning of each round, saving trips to restock.
If you need to replace part of a graceful outfit with warm items to hit the 4-item requirement, opt to replace the gloves and hood first as they give the least weight reduction and run energy restoration bonuses. Without the graceful outfit, the beginning of the round (where you take most damage while soloing) may last significantly longer. Thus, you may need to bring more food or rejuvenation potions to solo the Wintertodt with this bare-bones setup.
Any level explorer’s ring is very useful to regain run energy. The ring of endurance can also greatly improve run energy management.
Stacking the effects of the Hitpoints cape and the regen bracelet may reduce the amount of rejuvenation potions you require to up-keep your warmth.
For players who have obtained the Max cape, it is an improvement over the Hitpoints cape as it offers the combined benefits of the Hitpoints cape, Agility cape, Construction cape, and Firemaking cape. With it, your POH can be used instead of Ferox Enclave to restore stats between rounds.
If taking a bruma torch in the off-hand slot, take a hammer or an equivalent item in your inventory. If taking an Imcando hammer in the off-hand slot, take a tinderbox or an equivalent item in your inventory.
Starting a round
There is no need to bring food, as Rejuvenation potions weigh less and heal more per slot than almost all foods. Upon entering the Wintertodt prison, grab some unfinished rejuvenation potions and complete them with the bruma herbs available near the entrance from the crate.
You want to reduce the Wintertodt’s energy from 100% down to 20-30% as quickly as you can – this reduces the passive damage that interrupts activities as well as increases attacks that extinguish the brazier which grants efficient points and xp. Do this by running around the prison, lighting all the braziers. Once all four braziers are lit, begin chopping bruma root to fletch into kindling and feed the brazier. If a brazier is extinguished in this early stage, run to light it again. It is possible to fletch 2-3 kindling while running between two braziers.
Alternatively, once all braziers are lit, players may return to the safe area and wait for the Wintertodt’s energy to deplete, only leaving to relight the two closest southern braziers. Since you are more likely to be damaged by the Wintertodt during this early stage, this method saves some rejuvenation potions. Note that fletching is not allowed in the safe area.
Strategy
With the Wintertodt’s energy reduced, passive damage and area attacks will be far less frequent, while braziers explosions and pyromancer damage will be far more frequent.
Shift your focus to the south-western brazier. Unlike the two eastern braziers, path-finding between the bruma root and either of the two western braziers places you immediately beside the pyromancer, saving a small amount of time when healing them. And unlike the north-western brazier near the slow agility pillars, the south-western brazier is only 10 ticks away from either of the adjacent braziers. The south-western roots are also 10 ticks away from the south-eastern brazier. Repairing or lighting a brazier is 1 tick faster when actively moving towards it, so even if you manually click the tile to pathfind next to the pyromancer, you will lose 1 tick and it is still slower to use the eastern braziers.
For maximizing points, games will last infinite duration:
- Focus on running to heal all 4 pyromancers whenever you are fletching, since you can fletch while running (assuming you avoid the agility obstacle). Keeping 6-8 rejuvenation potions on hand is helpful.
- If the Wintertodt’s energy is high enough (8-30%), fletch by the brazier, fixing and lighting it as soon as it extinguishes, and heal the pyromancer each time she is damaged. Or for more relaxed play, only fix the brazier while you are actively feeding it, and otherwise enjoy fletching automatically.
- Keep in mind that at 30% energy, brazier attacks will happen at 70% of their normal rate and standard attacks that interrupt fletching will happen at 30% of their normal rate; at 10% energy, brazier attacks will happen at 90% of their normal rate (0.3x more often, minor difference) and standard attacks will happen at 10% of their normal rate (3x less often, major difference). This means that keeping the Wintertod’s energy as low as possible will result in both less clicking and more points and xp regardless of your strategy.
- If the Wintertodt’s energy gets below around 8%, avoid lighting any brazier as this may end your round prematurely (it is rare, but a single lit brazier can reduce a full 6% or more at the end of the game depending on when it randomly gets extinguished). Instead, use this time to chop and fletch kindling, heal other pyromancers, or create more potions.
For instead maximizing Firemaking experience, games will last 15-20 minutes:
- Focus on burning logs and lighting only the south-west brazier as soon as it extinguishes.
- To avoid spending time making more potions, you may choose to only heal the pyromancer when she’s been damaged twice. Make sure to heal her on the same tick as she reaches 0 health so her magic is not interrupted. Around six rejuvenation potions is usually enough for a full round of pyromancer healing if conserving them efficiently.
Ending a round
Once you are tired of playing, or when you are close to being forcibly logged out after 6 hours, consider how to end your round. Make sure you’re stocked up on rejuvenation potions, then:
- If you are willing to increase your focus and have plenty of run energy, pick any 2 braziers, running between them to keep them lit. If both stay lit, either light a third, chop and burn kindling, or fletch while standing between both braziers so that you may quickly run to one that does extinguish.
- If you would rather be patient, just focus on fixing and lighting the south-western brazier as soon as it extinguishes while optionally continuing to chop and burn logs or kindling. This method is also preferable if you are out of run energy.
Experience
Solo experience (fletching + healing)
Players can expect to earn 48 rewards per hour with this strategy. It provides the most possible rewards per hour, up to a theoretical high of 144,000 points in a single 6-hour session before being forcefully logged out.
| XP/h | XP/h | XP/h | XP/h | |||||||
|---|---|---|---|---|---|---|---|---|---|---|
| 50 | 121,000 | 50 | 5,000 | 50 | 9,000 | 50 | 10,000 | |||
| 60 | 145,000 | 60 | 6,000 | 60 | 11,000 | 60 | 12,000 | |||
| 70 | 170,000 | 70 | 7,000 | 70 | 13,000 | 70 | 14,000 | |||
| 80 | 194,000 | 80 | 8,000 | 80 | 15,000 | 80 | 16,000 | |||
| 90 | 218,000 | 90 | 9,000 | 90 | 16,000 | 90 | 18,000 | |||
| 99 | 240,000 | 99 | 10,000 | 99 | 18,000 | 99 | 20,000 | |||
Solo experience (no fletching)
Players can expect to earn 38 rewards per hour with this strategy. It provides slightly more points/hour and slightly more xp/hour than mass world fletching.
| XP/h | XP/h | XP/h | |||||
|---|---|---|---|---|---|---|---|
| 50 | 157,000 | 50 | 8,000 | 50 | 10,000 | ||
| 60 | 188,000 | 60 | 9,000 | 60 | 12,000 | ||
| 70 | 219,000 | 70 | 11,000 | 70 | 14,000 | ||
| 80 | 251,000 | 80 | 12,000 | 80 | 16,000 | ||
| 90 | 282,000 | 90 | 14,000 | 90 | 18,000 | ||
| 99 | 310,000 | 99 | 15,000 | 99 | 20,000 | ||
